Friday 22 April 2016

Puna de Atacama - March 2016

Easy Mountaineering in the Argentine and Chilean Atacama


This trip to the Puna de Atacama was organised and led by John Biggar. We started and ended in Copiapo (in Chile), from where we hired a 4x4 from Europcar. The first part of the trip was based around Antofagasta de la Sierra (in Catamarca Province, Argentina). We then re-crossed the Paso de San Francisco, heading back into Chile, to climb Ojos del Salado.

Links to Photographs from this Trip


Cerro Miriguaca


Cerro Miriguaca is a peak of around 4740 m that is easily accessible from Antofagasta de la Sierra (in Catamarca Province, Argentina) and a useful acclimatization hike. The summit gives good views over the surrounding landscape.

Cerro Miriguaca (left-of-centre on the skyline)

The ascent of this peak is quite a simple hike across slopes covered by tufty ichu grass. We left our vehicle at (3751 m, lat. -25.97441°, long. -67.33219°) and, after crossing the small gully, headed up the hillsides in a northeasterly direction. Our route is indicated by the waypoints given below.

Summit View from Cerro Miriguaca

Key Waypoints (latitude/°, longitude/°, elevation/m)

-25.96144 , -67.31422 , 3967
-25.96142 , -67.31424 , 3966
-25.95669 , -67.30398 , 4316
-25.95396 , -67.29126 , 4534
-25.94921 , -67.28718 , 4665
-25.95160 , -67.28519 , 4743   Summit


Laguna Blanca Sur


Laguna Blanca Sur (not an official name) is a peak of around 5930 m elevation at the southern end of the Sierra Laguna Blanca, in the Catamarca Province of Argentina. It is clearly visible from the highway (Ruta 43) leading from Belen to Antofagasta de la Sierra.

Laguna Blanca Sur


Approach to High Camp

A track leads from the main highway at (lat. -26.73053°, long. -67.03138°) and heads towards the foot of the mountain. We left our vehicle at (lat. -26.70545°, long. -67.04548°) at ca. 3880 m. Although the track continues for several kilometres beyond this point, there is a steep slope, comprised of loose sand, that you would need to be confident of being able to ascend upon your return. Follow the track as far as the animal corral at (lat. -26.66377°, long. -67.04176°) at ca. 4080 m. Shortly thereafter you should cross the stream and then make your way up the right-bank (when looking uphill). Further up the valley splits (photo) and you should head up to the right so as to enter the righthand branch of the valley. The location of our highcamp (photo) was (4704 m, lat. -26.61776°, long. -67.03821°), limited to this rather low altitude by the availability of water.

Route Schematic (click on image to see an enlarged version; then close the image using the button in the top-right corner to return to this page)


High Camp to the Summit

From high camp there are two possible routes to the summit (see the schematic below):

Option 1 (red dots - the route we followed)
Follow the valley from the camp up to the obvious col at the head of the valley (5122 m, lat. -26.59986°, long. -67.03848°). At the col bear sharply left and begin the climb up the loose rocky slope of the southeast ridge of the mountain.

Option 2 (purple dots - untested, but possibly simpler)
From the high camp, head up the slope on the western side and make your way up onto the foot of the south ridge of the mountain (around lat. -26.61965°, long. -67.04229°). Then make your way straight up the south ridge (photo).

Route Schematic (click on image to see an enlarged version; then close the image using the button in the top-right corner to return to this page)


These two routes meet where the “summit ridge” starts - around (5460 m, lat. -26.59737°, long. -67.05167°) and the gradient begins to reduce. From here it is easy-going to the summit (5935 m, lat. -26.58404°, long. -67.06100°).


Summit view from Laguna Blanca Sur

Key Waypoints (latitude/°, longitude/°, elevation/m)  - via Option 1

-26.59986 , -67.03848 , 5122   Col
-26.59698 , -67.04615 , 5301
-26.59976 , -67.04886 , 5372
-26.59737 , -67.05167 , 5456
-26.59453 , -67.05430 , 5679
-26.59199 , -67.05513 , 5744
-26.58587 , -67.06019 , 5903
-26.58404 , -67.06100 , 5935   Summit
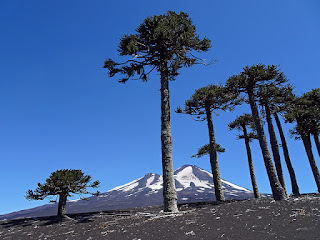

Cerro Laguna Blanca


Cerro Laguna Blanca is a peak of just over 6000 m in the centre of the Sierra Blanca, in the Catamarca Province of Argentina.

Sierra Laguna Blanca (Co. Laguna Blanca is behind this ridge)


Approach to High Camp

From the road just south of El Penon, drive across the flood plain leading up to the foothills (following various ill-defined vehicle tracks) to around 4200 m  - we “parked” our vehicle at (lat. -26.54702°, long. -67.15883°).

From this point you head towards the point where a small valley emerges from the hills (photo). A stream descends this valley. Follow the bed of the stream up the valley, which becomes progressively narrower. At one point you have to scramble up beside a small waterfall (photo), or you can climb up the righthand hillside to skirt around this obstacle. This route is marked by red-dots on the schematic below.

The location of our highcamp (photo) was (4911 m, lat. -26.57046°, long. -67.10728°), at the side of a broad floodplain, although a higher camp may be possible (and preferable) if there is running water above this point in the valley.

An alternative route to highcamp: rather than following the stream bed it is possible to make your way up the lefthand hillside towards a col which is visible on the skyline (photo - with col indicated). From the col (4980 m, lat. -26.56555°, long. -67.11160°) you look out over the floodplain (photo) and it is an easy descent to the campsite. This route would be preferred to the normal route if the stream level is high, or if you are accompanied by animals. It is marked by purple-dots on the schematic below.

Route Schematic (click on image to see an enlarged version; then close the image using the button in the top-right corner to return to this page)


High Camp to the Summit

Head eastwards up the valley (photo), which narrows before turning sharply to the left. Continue climbing up the valley, which now heads in a northerly direction. The summit ridge of the Sierra Laguna Blanca runs parallel to the valley on the righthand (eastern) side. There are two obvious easy routes up the slopes to this ridge. The first way (the route we took) starts at around 5531 m (lat. -26.54849°, long. -67.07424°) and leads up to the ridge just before (on the southern side of) the “south summit”. The second starts at around 5610 m (lat. -26.53733°, long. -67.07193°) and leads up to reach the ridge between the true summit and the “south summit”.

Route Schematics (click on image to see an enlarged version; then close the image using the button in the top-right corner to return to this page)

Overview of route

 Approaching the summit


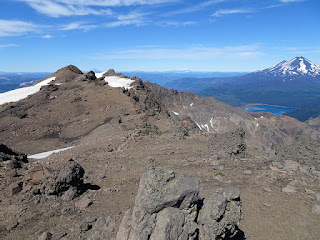
Where exactly is the summit?

Cerro Laguna Blanca is part of an extended ridge (running north-south) which has a number of high points. There is a minor summit of just under 6000 m, the “south summit”, with a large stone platform (presumably of Inca-origin) and a stone wind-break, at (5992 m, lat. -26.54241°, long. -67.06238°). However, the true summit (with an elevation of over 6000 m) lies north of this, on a gently undulating plateau. The exact location of the true summit is not immediately obvious. The summit we reached was located at (6009 m, lat. -26.53388°, long. -67.06114°), but there is another point of similar height lying slightly further to the north.

Summit panorama from Cerro Laguna Blanca

Key Waypoints (latitude/°, longitude/°, elevation/m)  - via Option 1

-26.56976 , -67.09320 , 5065
-26.56814 , -67.08534 , 5166
-26.56080 , -67.07953 , 5316
-26.54849 , -67.07424 , 5531
-26.54923 , -67.06842 , 5683
-26.54744 , -67.05994 , 5899
-26.53654 , -67.05964 , 5986
-26.53388 , -67.06114 , 6009   Summit (?)
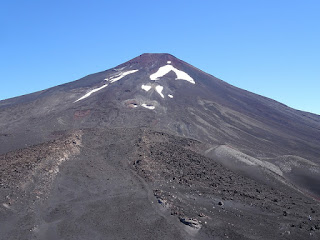

Ojos del Salado


Ojos del Salado is the second highest peak in South America and the highest volcano in the world. It has two summits (which are closely-spaced and of virtually the same elevation) – these are commonly referred to as the Chilean summit and Argentinian summit.

View of Ojos del Salado (from the Chilean side)


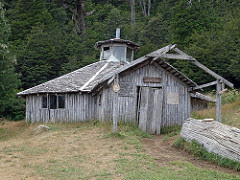
We approached the mountain from the Chilean side, which is quicker and logistically simpler, since there is a driveable track up to high elevations on this side of the mountain. There are also two "refuges" (simple converted shipping containers) – the Atacama Refuge (Refugio Universidad de Atacama) at around 5200 m and the Refugio Tejos at 5830 m. When we climbed the peak (in late March 2016) there was very little snow on the mountain and crampons/ice axes were not required.

Important - because it is easy to access, this mountain could easily be underestimated. By any measure this is a seriously high mountain and appropriate acclimatization to altitude is essential. We were lucky with the weather, but the mountain is prone to high winds and very low temperatures, so appropriate cold-weather gear is also essential.

Refugio Tejos to the Crater

From the Refugio Tejos there is a clear trail which zig-zags up a pale-coloured shale slope, before crossing a small patch of snow and then “traversing” around to the right to access the small crater below the summit.

Click on the diagram to enlarge ...


In the absence of snow and ice, this section of the climb is no more than a very high altitude hike, with no technical difficulties. As you gain altitude the views over the surrounding landscape get better and better ....

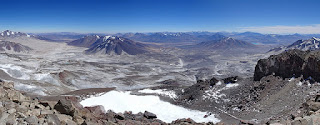
Panorama from the crater of Ojos del Salado, at around 6740 m


Crater to the Summit

The view of the summit when you get to the crater is shown below. From the floor of the crater to the summit is a further climb of around 150 m.

Summit of Ojos del Salado


A path (visible on the above photograph) skirts around the lefthand side of the crater and then climbs up through the boulders on the far side. The route to the Chilean summit is up a gully (photo) that is located towards the righthand side of the headwall.

At the top of this gully is a short technical section. The fixed rope that was installed several years ago is no longer fit for purpose, and John Biggar led this part of the climb for our group and installed protection for the rest of us. We also abseiled down this section on the return, rather than back-climbing the route.


Scramble up to the Chilean Summit

Once up this section, there is a very short walk along the ridge to the summit.

The view from the summit are spectacular and an appropriate reward for the hard effort expended in getting there ....


Summit Panorama 1


Summit Panorama 2


Summit Panorama 3


How high is Ojos del Salado ?

The elevation of the summit is most commonly given as 6893 m - my own GPS units (a Garmin eTrex10 and that built into the Sony HX90 camera) gave readings of 6903-6905 m based on the WGS84 datum.


Chilean Lake District - February 2016

As a prelude to a trip to the Puna de Atacama I spent a very pleasant week in February 2016 in the northern part of the Chilean Lake District, completing day hikes and ascents of some of the peaks, whilst staying in comfortable lodges near Malalcahuello and Pucon. This section describes a few of the hikes in this area that I would recommend.

Links to Photographs from this Trip


Volcan Lonquimay


Summary
Volcán Lonquimay is one of the most accessible volcanoes in this region.  Under normal summer conditions it has little snow coverage and is not technically difficult, and the summit provides stunning views over the surrounding country.  There is a small ski resort on the southeastern slopes, but this does not detract significantly from the hike.

https://www.flickr.com/photos/rogernix/26292903672/in/album-72157666993311295/
Volcan Lonquimay

Description of Hike

The best starting point for the ascent of Lonquimay is the point on the Reserva Nacional Nalcas dirt-road from where the hike to Crater Navidad starts (1823 m, lat. -38.38145°, long. -71.54850°). There is room to leave a vehicle parked on the side of the road and, from here, it is an ascent of just over 1000 m to the summit (photo).  The trail to Crater Navidad is well marked, heading off downhill to the right, but there is not a well-defined trail to the summit of Lonquimay from this point.  However you should see evidence of some tracks in the sand left by previous hikers.  You need to head across the sandy, and increasingly steep, slopes, always aiming for the top of the highest chairlift (high-up on the lefthand skyline).  Just before reaching this top-station (ca. 2400 m) you will probably intersect one of the upper 4WD tracks that are used by the ski-resort staff to maintain the lifts.  A trail starts up the steep final ridge to the summit from near the top of the ski-lift – from this ridge you have good views to the south (photo).  The final ascent is steep and there are lots of loose rocks on the trail, but there is no real exposure.  In places you will need to take care not to knock such rocks down onto any other hikers below you.
The trail reaches the crater rim at its highest point (2858 m, lat. -38.37979°,  long. -71.58586°) and from here you have an excellent view of the crater and its permanent ice-field (photo). Immediately to the northwest is Volcán Tolhuaca (photo). In clear weather you also have good views of the Sierra Nevada and Volcán Llaima to the south (photo) and Volcán Callaqui to the north (photo), as well as other more distant volcanoes.

It is possible to descend into the crater and walk across the ice-field to the opposite rim.  However, if you do this, you have to return by the same route and the climb back up to the crater rim is "punishing" and very loose.  There is no reasonable route by which you can walk around the whole of the crater rim.
Note – if you are intending to ascend to the summit of Lonquimay then you are expected to complete the appropriate form at the CONAF checkpoint on the access road to the Reserva Nacional Nalcas. This requires you to declare that you are appropriately equipped for the climb.

Duration:  half-day; but you can extend it by hiking over to see the Crater Navidad (photo) during the descent. 

Maps:  Travel & Trekking Map - Lonquimay (1:100000); Viachile Editores, 2011(ISBN 978-956-8925-17-8) ... it is no use for navigating on the hike, but it gives you an idea of the lay of the land.

Other references:  www.trekkingchile.com


Sierra Nevada (from Malacahuello)


Summary
The Sierra Nevada is a non-volcanic peak of around 2550 m elevation, located south of Malalcahuello and northeast of Lago Conguillio. The approach to the peak from the north (the route described here) is a non-technical hike in summer, although there are some loose and steep slopes near the summit. The hike provides excellent views of Volcán Llaima and the surrounding countryside.

https://www.flickr.com/photos/rogernix/26359084856/in/album-72157666993311295/
Summit Ridge of Sierra Nevada


Description of Hike

Getting to the open ridge ...

The approach to the summit of Sierra Nevada is along the north ridge of the mountain which has a treeline at about 1700 m.

If you are doing this hike with a local guide then they will probably arrange for you to be taken up almost as far as the treeline in a 4WD vehicle, and you then have an ascent to the summit of only around 900 m.

However, if you are without a guide then you may have to start from the Termas de Malalcahuello at around 1000 m elevation, in which case you have a much longer day ahead. In this case, you can park just to the right of the hotel entrance and you then start walking along the track passing to the right of the hotel. You will shortly come to a gate (see below) and the track splits immediately after the gate.


You now have a choice of routes to get onto the ridge ... in both cases there are occasional yellow-painted markers and arrows to indicate the route.

Option 1 : take the right-hand track that immediately begins to climb up the hillside, and again keep to the uphill track at the next junction. This track quickly enters mixed forest and zig-zags up the hillside onto the spine of the lower north ridge. Once on the ridge, the track levels out and heads south towards Sierra Nevada. After a while the track enters more dense forest and becomes a trail. There are a couple of places where the track enters a clearing and navigation can become difficult as the next yellow markers are not easily seen, or have been dislodged ... if necessary, backtrack to the last mark and scout around for another trail marker. Eventually you re-join a proper, 4WD track and there is a gate with a sign indicating that you are entering the national park (Parque Nacional Conguillio). From here the trail is obvious and you quickly get to the treeline and onto the open ridge.

Option 2 : take the left-hand track along the valley floor. Follow the track until it becomes a trail which then starts gradually climbing through the forest. Again there are a couple of places where the track enters a clearing and navigation can become difficult as the next yellow markers are not easily seen, or have been dislodged ... if necessary, backtrack to the last mark and scout around for another trail marker. The final climb up the ridge is steep, but at least you can enjoy views up to the head of the valley and the summit behind.

The two routes meet on the open ridge, a short way above the treeline at around 1790 m.

I would recommend the first option for the ascent (as it is a more gradual climb) and then to return by the valley trail.

Above the treeline ...

Once you are on the ridge, above the treeline, then the summit is visible ahead of you (photo). Follow the faint trail up the broad ridge (in a southerly direction), climbing steadily. The route is also marked by occasional stone cairns. You are initially heading towards the snowy-col to the right of the summit (see previous photo .. the col is on the skyline, well to the right of the summit and to the left of a small rocky knoll).

The next section is best read whilst viewing the route schematics (which follow this section).

The ridge narrows and steepens as you gain height. As you approach the top of the ridge you need to head to the right. You will pass a very small lake as you make your way towards the snowy-col. Head towards the col (photo), but do not actually go all the way up to it. Instead, perhaps 50 m before the col, head sharply back up to the left, making your way carefully up a steep, loose slope - watch out for the occasional stone cairn. As you emerge at the top, bear sharply back to the right. Head across the mixed terrain (rocky outcrops, patches of snow/ice etc.) until you get to the foot of the northwest ridge leading up to the summit. Now it is an easy scramble up this ridge to the summit, following the faint trail. At the northern summit (2551 m, lat. -38.57582°, long. -71.58928°) there is a stone wind-break and a log-book.

Route Schematics (click on each image to see an enlarged version)

1. Route up north ridge

2. Traverse across to snowy-col

3. Route up from col to summit


Key Waypoints (latitude/°, longitude/°, elevation/m)

-38.54171, -71.59609,  1792
-38.55939, -71.59368,  2049
-38.56545, -71.59383,  2184
-38.56802, -71.59386,  2213  Near small lake
-38.56951, -71.59415,  2246
-38.57082, -71.59292,  2323
-38.57125,  -71.59208,  2365
-38.57305,  -71.59232,  2388
-38.57582,  -71.58928,  2551  Summit

Duration:  1 day (a long day if you are hiking from Termas de Malalcahuello). 

Maps:  Travel & Trekking Map - Lonquimay (1:100000); Viachile Editores, 2011(ISBN 978-956-8925-17-8) ... it is no use for navigating on the hike, but it gives you an idea of the lay of the land.

Other references:  www.trekkingchile.com


Is the northern summit the true summit of the Sierra Nevada ?

When you reach the summit described above, you will look along the ridge to the south (photo) and see a number of points along that ridge that could be higher than where you are standing. It is possible that this is an optical illusion, and that they are actually lower, but I'm not sure. If you check on Google Earth there are perhaps three point along the ridge (one of which is the north summit) which are the same elevation within the accuracy of the digital data used by Google Earth.


Parque Nacional Conguillio


Summary
The most popular trail in the national park is from Playa Linda up into the Sierra Nevada, as this provides fantastic views of Laguna Conguillio, with Volcán Llaima as a backdrop. However, if you want something different, or simply wish to avoid the crowds in January/February, then the hike which is described here is a worthy alternative with excellent views and a wide range of scenery.

https://www.flickr.com/photos/rogernix/26111871760/in/album-72157666993311295/
Volcan Llaima

Description of Hike

This hike begins at Laguna Captren (photo, where parking is available) and generally follows good trails, with good way-marking.  The trail begins from the road, opposite the viewpoint for Laguna Captren - this first section follows part of the "Sendero de Chile" towards Truful-Truful (it is marked as light-blue on the park map, with poles of this same colour used to mark the route). You initially climb easily through the forest before emerging at the treeline with good views of Volcán Llaima (photo). The trail then climbs across the sandy lower slopes of the volcano to reach a col (1778 m, lat. -38.66773°, long. -71.68920°).

Note - at this point there is a very worthwhile diversion up to the hill on your left, marked as Pk1885 on the Conguillio (1:100000) map. From the top of the hill (1879 m, lat. -38.66834°, long. -71.68206°) you have 360° views (photo), which include Volcán Llaima, the Truful-Truful valley and Laguna Conguillio.

Descending from the col, you come to a junction where the path splits - the blue trail continues down to Truful-Truful, whilst the orange trail heads down to the left to Laguna Verde. Follow the orange trail. This skirts below some vegetated cliffs before crossing the sandy lower slopes to reach the main park road at Laguna Verde.

At this point you unfortunately have to follow the dirt-road for some distance towards Laguna Conguillio - turn left onto the road, and head uphill. However, there is not much traffic and it is quite a pleasant walk (photo). You can also stop for a while at the colourful Laguna ArcoIris (photo).

Just before reaching Laguna Conguillio, turn left onto a trail (the red Contrabandista trail) that cuts across to the main information centre of the park. This passes through sandy scrubland with Araucaria trees and provides yet more views of Volcán Llaima (photo).

Upon reaching the information centre, follow the road in a westerly direction for 50 m, and then take the trail on the righthand side (the dark-green Los Carpinteros trail). This leads through dense, ancient forest back to Laguna Captren.

Duration:  1 day (a very long day if you are staying outside the park and need to drive to/from the park at the beginning and end of the day). 

Maps:  Travel & Trekking Map - Conguillio (1:100000); Viachile Editores, 2011(ISBN 978-956-8925-18-5) ... it is no use for navigating on the hike, but it gives you an idea of the lay of the land.
A copy of the park trail map is available from Parque Nacional Conguillio : Information of Trails


Hikes around Pucon


My visit to the Pucon/Villarica region was affected by bad weather and this stopped me from undertaking any of the more serious hikes in this area. However, I would recommend that anyone visiting this area consider the following hikes:

Cerro San Sebastian (in the Parque Nacional Huerquehue)

This hike begins at the CONAF hut beside Lago Tinquilco (where parking is available, and you should register for the ascent of San Sebastian). The hike involves an elevation gain of around 1100 m and you return via the same route as for the ascent.


https://www.flickr.com/photos/rogernix/25781651743/in/album-72157666993311295/
Lago Verde (Parque Nacional Huerquehue)

The path initially climbs steadily through the forest up to Quinchol. At the top of this initial climb the trail emerges from the forest into an open area on the ridge, providing views up to the summit of San Sebastian. The trail then heads along the ridge in a northeasterly direction, through forest and shrubs, steadily gaining more height - keep an eye out for Magellanic woodpeckers (photo). Finally the trail emerges onto a narrow ridge above the treeline (photo). The last stage of the hike to the summit (1915 m, lat. -39.14872°, long. -71.68809°) involves some clambering across rocky terrain.

From the summit ridge, there are views down to many of the lakes of the Parque Nacional Huerquehue (see above for an example). On a clear day - not like the day when I did this hike! - you should also have excellent views of the volcanoes of Villarrica, Quetrupillan and Lanin.


Santuario El Cañi 

This is a private reserve, lying east of Pucon, which can be accessed from the road between Villa San Pedro and Huife. A small entrance fee is payable at the administration office, and for this you get a well-written information leaflet (available in several languages, including English). The hike involves an elevation gain of around 1100 m and you return via the same route as for the ascent.

https://www.flickr.com/photos/rogernix/25781490343/in/album-72157666993311295/
Refugio Aserradero (Old Sawmill Hut)


The first part of the hike is relentlessly uphill and particularly steep, taking you through various vegetation zones. However, once you have completed this climb it levels off and you can enjoy the unspoilt forest with its abundant bird-life (photo). On the plateau you have the option to hike a short circular trail past the numerous small lakes (photo).  The trail then climbs up to Mirador Melidekiñ (ca. 1500 m) - from there, on a clear day (not like the day when I did this hike!) you should have excellent views of the volcanoes of Villarrica, Quetrupillan and Lanin.

Maps:  Travel & Trekking Map - Pucon (1:100000); Viachile Editores, 2014(ISBN 978-956-8925-04-8).